正式开发
一:数据库设计、
SET FOREIGN_KEY_CHECKS=0;


关闭外键约束检查:当执行 SET FOREIGN_KEY_CHECKS=0; 语句时,数据库会暂时关闭对外键约束的检查机制。
首先创建简单的用户表(easyuser):
用户表的字段有:
id,自增,主键
username,password,email,role,state,
ENGINE=InnoDB AUTO_INCREMENT=10 DEFAULT CHARSET=utf8;
数据库创建:
# 权限系统表设计
create schema db_authority_system;
drop table if exists 'easyuaer';
SET FOREIGN_KEY_CHECKS=0;
use db_authority_system;
create table easyuser(
id int(24) auto_increment comment '主键',
username varchar(255) not null comment '账号',
password varchar(255) default '123456' ,
email varchar(255) not null comment '邮箱',
role varchar(255) not null comment '角色',
state tinyint(255) not null comment '状态',
primary key (id)
) ENGINE =InnoDB AUTO_INCREMENT=2 default charset =utf8;
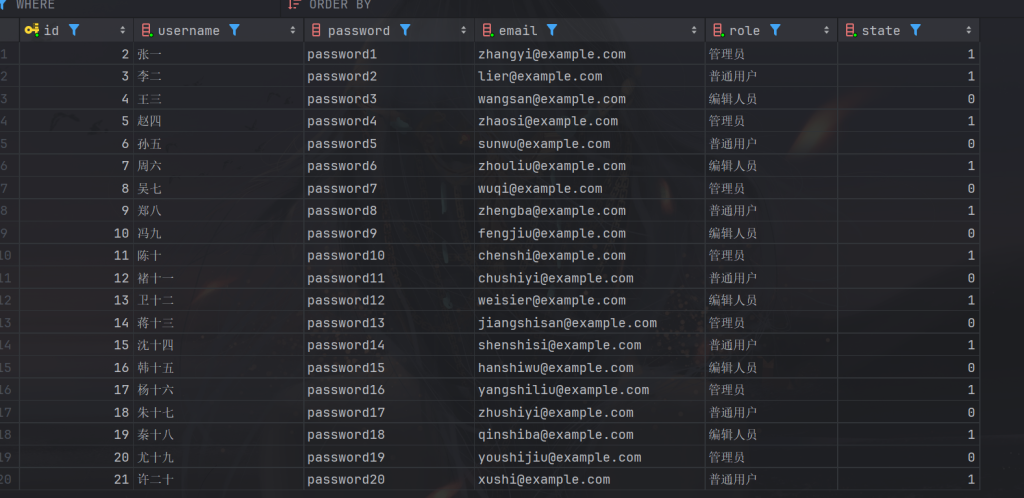
INSERT INTO easyuser
(username, password, email, role, state) VALUES
('张一', 'password1', 'zhangyi@example.com', '管理员', 1),
('李二', 'password2', 'lier@example.com', '普通用户', 1),
('王三', 'password3', 'wangsan@example.com', '编辑人员', 0),
('赵四', 'password4', 'zhaosi@example.com', '管理员', 1),
('孙五', 'password5', 'sunwu@example.com', '普通用户', 0),
('周六', 'password6', 'zhouliu@example.com', '编辑人员', 1),
('吴七', 'password7', 'wuqi@example.com', '管理员', 0),
('郑八', 'password8', 'zhengba@example.com', '普通用户', 1),
('冯九', 'password9', 'fengjiu@example.com', '编辑人员', 0),
('陈十', 'password10', 'chenshi@example.com', '管理员', 1),
('褚十一', 'password11', 'chushiyi@example.com', '普通用户', 0),
('卫十二', 'password12', 'weisier@example.com', '编辑人员', 1),
('蒋十三', 'password13', 'jiangshisan@example.com', '管理员', 0),
('沈十四', 'password14', 'shenshisi@example.com', '普通用户', 1),
('韩十五', 'password15', 'hanshiwu@example.com', '编辑人员', 0),
('杨十六', 'password16', 'yangshiliu@example.com', '管理员', 1),
('朱十七', 'password17', 'zhushiyi@example.com', '普通用户', 0),
('秦十八', 'password18', 'qinshiba@example.com', '编辑人员', 1),
('尤十九', 'password19', 'youshijiu@example.com', '管理员', 0),
('许二十', 'password20', 'xushi@example.com', '普通用户', 1);我们从id=2开始插入了20条数据
菜单表(mainmenu):
SET FOREIGN_KEY_CHECKS=0;
drop table if exists mainmenu;
set foreign_key_checks =0;
create table  mainmenu(
    id  int (50) auto_increment primary key not null ,
    title varchar(255) not null ,
    path varchar(255) not null

)ENGINE =InnoDB char set =utf8,auto_increment=1;
INSERT INTO `mainmenu` VALUES ('100', '权限管理', '/admin');
INSERT INTO `mainmenu` VALUES ('200', '运动平台', '/use');
id,title,path
submenu(提交菜单表):
id,title,path,mid,
#提交菜单
drop table if exists submenu;
set foreign_key_checks =0;
create table submenu(
    id int(50) primary key  auto_increment not null comment '主键',
    title varchar(255) not null   comment '名称',
    path varchar(255) not null comment '路径',
    mid int(50) not null ,
    INDEX mid_idx (mid),
    constraint submenu_ibfk_1 foreign key (mid) references mainmenu (id) #外键
)ENGINE =InnoDB char set =utf8 auto_increment=1;
INSERT INTO `submenu` VALUES ('101', '用户列表', '/user', '100');
INSERT INTO `submenu` VALUES ('102', '修改权限', '/rights', '100');
INSERT INTO `submenu` VALUES ('103', ' 运动模块', '/sport', '100');
INSERT INTO `submenu` VALUES ('104', '商品模块', '/goods', '100');
INSERT INTO `submenu` VALUES ('201', '运动科普', '/Introduction', '200');
INSERT INTO `submenu` VALUES ('202', '卡路里', '/calories', '200');
INSERT INTO `submenu` VALUES ('203', '营养配餐', '/food', '200');
创建索引的两种方式:
CREATE TABLE submenu (
    id INT(50) PRIMARY KEY AUTO_INCREMENT NOT NULL COMMENT '主键',
    title VARCHAR(255) NOT NULL COMMENT '名称',
    path VARCHAR(255) NOT NULL COMMENT '路径',
    mid INT(50) NOT NULL,
    -- 创建索引使用以下方式之一
    -- INDEX mid_idx (mid),
    -- 或者使用 CREATE INDEX 语句单独创建索引
    -- CREATE INDEX mid_idx ON submenu(mid);
    CONSTRAINT submenu_ibfk_1 FOREIGN KEY (mid) REFERENCES mainmenu(id)
) ENGINE=InnoDB CHARSET=utf8mb4;
二:创建SpringBoot项目
创建工程时勾选SpringWEB,JDBC API,创建Mybatis框架,以及Mysql驱动
启动类:
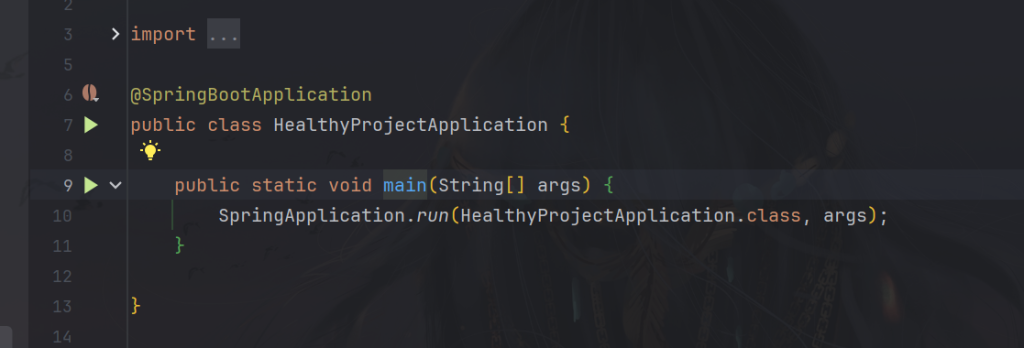
创建后我们看到工程里的启动类,这时我们启动不了,因为我们没有配置数据源

在Spring Boot开发中,需要在application.yml中被指数据库的连接信息,以下是MySQL连接配置以及pom文件的MySQL依赖
server:
  port: 8080
spring:
  datasource:
    driver-class-name: com.mysql.cj.jdbc.Driver
    url: jdbc:mysql://localhost:3306/test?&useUnicode=true&characterEncoding=UTF-8&serverTimezone=Asia/Shanghai
    username: root
    password: 123456
1、port是端口
2、drive-class-name:表示MySql版本是8.0版本
3、URL:连接数据库其中 jdbc:mysql表示通过jdbc来连接数据库。
4、Localhost:表示本机地址,
5、把test换成自己数据库名称即可,
6、username:表示账号名称,
7、password:输入自己的密码即可,
————————————————
记得刷新maven哦。
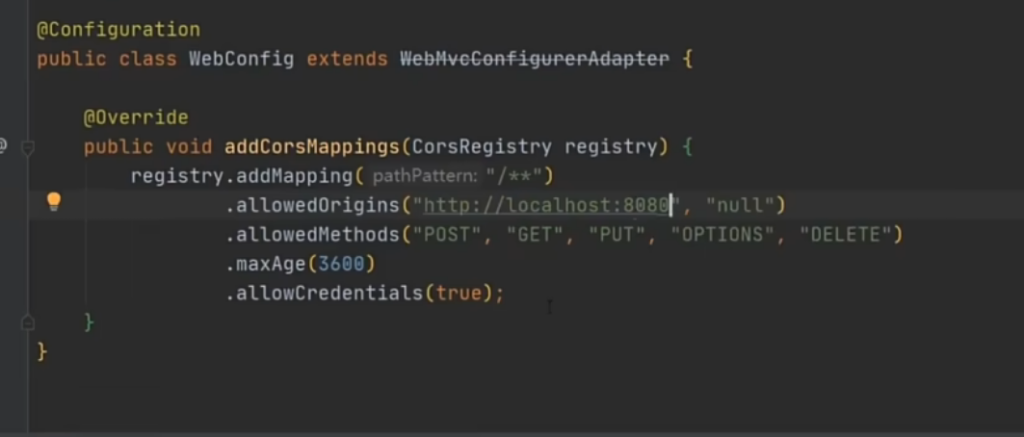
解决跨域问题(一种方法,也可以在配置文件里设置):
创建前端项目使用命令
vue ui
插件:element ui
依赖:less lessloder axios
路由配置:
Vue.use(VueRouter)
const routes = [
{
path : "/",
redirect:"/login" //重定向
},
{
path:"/login",//访问路径
component: login// 访问到的组件
}
]
const router = new VueRouter({
routes
})
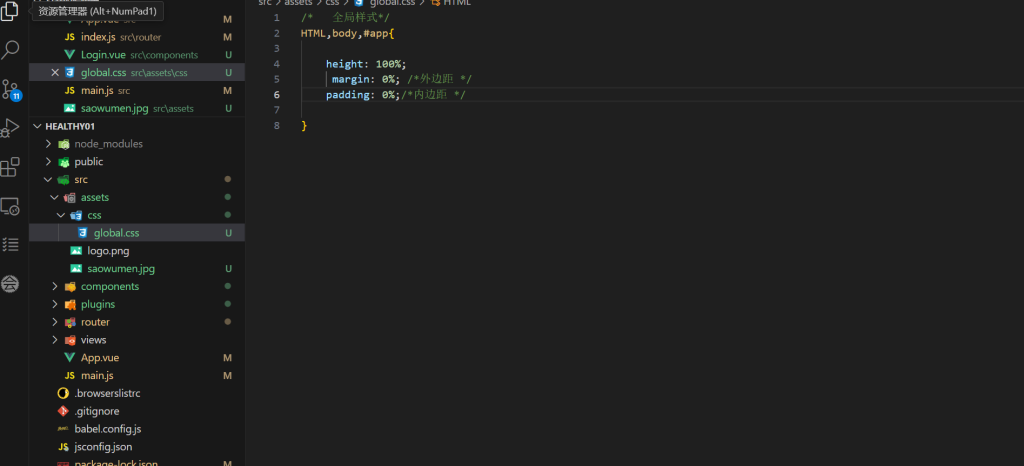
export default routerCss全局样式:height:高度
margin:外边距
padding:内边距
login页面设计:
知识点:
<template >
    <div class="login_container">
        <!-- 登录块 -->
        欢迎登录大健康幸福系统
        <div class="login_box">
            <!-- 头像区 -->
            <div class="avatar_box">

                <img src="../assets/image/xinxin.jpg" alt="6666" height="200" width="200">

            </div>
            <!-- 表单区域 -->

            <el-form ref="loginFormRef" :model="loginForm" class="login_form" label-width="0">
                <!-- 用户名 -->
                <el-form-item>
                    <el-input v-model="loginForm.username"></el-input>
                </el-form-item>
                <!-- 密码 -->
                <el-form-item>
                    <el-input v-model="loginForm.password"></el-input>
                </el-form-item>
                <!-- 按钮 -->
                <el-form-item class="btns">
                    <el-button type="primary" disabled>提交</el-button>
                    <el-button type="info" disabled>重置</el-button>
                </el-form-item>

            </el-form>


        </div>

    </div>


</template>


<script>
export default {
    data() {
        return {
            loginForm:{
                   username:"username",
                   password:"password"


            }
        }
    },

}
</script>


<style lang="less" scoped>

</style>
div标签中加class:
关联 CSS 样式规则:这是最主要的作用。在对应的 CSS 文件(或者在 Vue 组件的 <style> 部分等)中,可以通过定义 .login_container 这个 CSS 类来为该 <div> 元素设置各种各样的样式属性,比如设置背景颜色、字体大小、边框样式、内边距、外边距等等。例如:
.login_container {
    background-color: #f5f5f5;
    font-size: 16px;
    border: 1px solid #ccc;
    padding: 20px;
    margin: 10px;
}
<el-form> 组件
<el-form ref="loginFormRef" :model="loginForm" class="login_form" label-width="0">
                <!-- 用户名 -->
                <el-form-item>
                    <el-input v-model="loginForm.username"></el-input>
                </el-form-item>
                <!-- 密码 -->
                <el-form-item>
                    <el-input v-model="loginForm.password"></el-input>
                </el-form-item>
                <!-- 按钮 -->
                <el-form-item class="btns">
                    <el-button type="primary" disabled>提交</el-button>
                    <el-button type="info" disabled>重置</el-button>
                </el-form-item>

</el-form>功能概述:这是 Element UI 库中用于创建表单的组件。它提供了方便的方式来构建和管理表单相关的功能,比如收集用户输入、进行表单验证等
- 属性说明:
ref="loginFormRef":这个属性为表单组件设置了一个引用标识。在 Vue 组件的脚本部分,可以通过这个引用(this.$refs.loginFormRef)来获取到表单实例,进而对表单进行各种操作,比如手动触发表单验证、获取表单数据等。:model="loginForm":这里使用了 Vue 的动态绑定语法(通过:符号),将一个名为loginForm的数据对象与表单进行绑定。这样做的好处是,表单中的各个输入字段的值会自动与loginForm对象中的对应属性保持同步。也就是说,当用户在表单的输入字段中输入数据时,loginForm对象中的相应属性值会实时更新,反之亦然。class="login_form":给表单组件设置了一个 CSS 类名,目的是为了在样式部分(通常是在<style>区域或者相关的 CSS 文件中)可以通过定义.login_form这个 CSS 类来为表单设置特定的样式,比如设置表单的整体外观、边框样式、内边距等。label-width="0":通常在表单中,每个输入字段前面可能会有一个标签来标识该字段的用途(比如 “用户名”“密码” 等),这个属性用于控制这些标签的宽度。设置为0意味着不希望显示这些标签的宽度,可能是根据设计需求,采用了其他方式来标识输入字段的用途,或者不需要这种传统的带标签宽度的表单样式。
<el-form-item> 组件
<el-form-item>
                    <el-input v-model="loginForm.username"></el-input>
                </el-form-item>
                <!-- 密码 -->
                <el-form-item>
                    <el-input v-model="loginForm.password"></el-input>
                </el-form-item>
                <!-- 按钮 -->
                <el-form-item class="btns">
                    <el-button type="primary" disabled>提交</el-button>
                    <el-button type="info" disabled>重置</el-button>
</el-form-item>- 功能概述:它是配合
<el-form>组件使用的,用于包裹表单中的各个输入项(如文本输入框、密码输入框等),起到一个分组和组织的作用,并且可以在这个组件上设置一些与具体输入项相关的属性和操作。 - 后续可能的用法:通常在
<el-form-item>内部会放置具体的输入组件,比如<el-input>(用于文本输入)、<el-password>(用于密码输入)等,并且可以根据需要设置这些输入组件的各种属性,如绑定数据、设置输入类型、添加验证规则等。例如:
data 函数
- 在 Vue 组件中,
data函数是一个特殊的函数,它用于定义组件内部的数据。它返回的对象中的每个属性都代表了组件的一种数据状态。
<script>
export default {
    data() {
        return {
            loginForm:{
                   username:"username",
                   password:"password"


            }
        }
    },

}
</script>
这里的loginForm:{
username:”username”,
password:”password”
}是一个对象,而username和password是它的属性,
这里通过 :model="loginForm" 将脚本部分(<script>)中定义的 loginForm 对象与 <el-form> 组件进行了绑定。
当对象名和 model 属性值中的名称不一致时,可能会在代码阅读和后续维护过程中增加一些混淆因素。尤其是在较为复杂的项目中,可能会有多个表单,每个表单都有自己的数据绑定,如果名称不一致且缺乏清晰的文档或注释,可能会导致新加入项目的开发人员难以快速理解代码逻辑。
 <el-form-item>
                    <el-input v-model="loginForm.password" placeholder="请输入密码" prefix-icon="el-icon-loading"></el-input>
                </el-form-item>
placeholder=”请输入密码”会在方框内显示“请输入密码”
prefix-icon=”el-icon-loading”>这是在方框内显示图标
其他图标也可以在阿里巴巴图标图库寻找
<template >
    <div class="login_container">
        <!-- 登录块 -->
        欢迎登录大健康幸福系统
        <div class="login_box">
            <!-- 头像区 -->
            <div class="avatar_box">

                <img src="../assets/image/xinxin.jpg" alt="6666" height="200" width="200">

            </div>
            <!-- 表单区域 -->

            <el-form ref="loginFormRef" :model="loginForm" class="login_form" label-width="0">
                <!-- 用户名 -->
                <!-- 用户名 -->
                <el-form-item>
                    <el-input v-model="loginForm.username" prefix-icon="el-icon-s-custom"
                        placeholder="请输入账号"></el-input>
                </el-form-item>
                <!-- 密码 -->
                <el-form-item>
                    <el-input v-model="loginForm.password" placeholder="请输入密码" prefix-icon="el-icon-loading"
                        type="password"></el-input>
                </el-form-item>
                <!-- 按钮 -->
                <el-form-item class="btns">
                    <el-button type="info" plain>提交</el-button>


                    <el-button type="warning" plain>重置</el-button>

                </el-form-item>

            </el-form>


        </div>

    </div>


</template>


<script>
export default {
    data() {
        return {
            loginForm:{
                   username:"",
                   password:""


            }
        }
    },

}
</script>


<style lang="less" scoped>
//根节点样式背景颜色全覆盖
.login_container{
background-color: #2b4b6b;
height: 100%;
}

.login_box{
width: 450px;
height: 300px;
background-color: #c7a3ab;
border-radius: 5px;
position: absolute;//绝对定位
left: 50%;
top: 50%;
transform: translate(-50%,-50%);

.avatar_box {
        width: 130px;
        height: 130px;
        border: 1px solid#eeeeee;
        // background-color: #fff;
        border-radius: 50%;

        padding: 10px;
        box-shadow: 0 0 10px #ddd;
        position: absolute; //绝对定位
        left: 50%;
        top: 0%;
        transform: translate(-50%, -50%);
        background-color: #0ee;


    }

         img {

             width: 100%;
             height: 100%;
             border-radius: 50%;
             background-color: #eee;


         }
}
.btns{


display: flex;
justify-content: center;
align-items: center;
    /* 将按钮在交叉轴方向上居中 */

.btns.el-button {
        margin-left: 80px;
        /* 给每个按钮设置左边距,可根据需要调整这个值 */
    }
}


.login_form{

position: absolute;
bottom: 0%;
width: 100%;
padding: 0% 10px;
box-sizing: border-box;
}

.custom-submit-button {
    background-color: #0088cc;
    /* 设置提交按钮的背景色为浅蓝色 */
    color: white;
    /* 设置文字颜色为白色 */
}

.custom-reset-button {
    background-color: #ff9900;
    /* 设置重置按钮的背景色为橙黄色 */
    color: white;
    /* 设置文字颜色为白色 */
}

</style>
登录页面代码
<template >
<div class=”login_container”>
<!– 登录块 –>
欢迎登录大健康幸福系统
<div class=”login_box”>
<!– 头像区 –>
<div class=”avatar_box”>
<img src=”../assets/image/xinxin.jpg” alt=”6666″ height=”200″ width=”200″>
</div>
<!– 表单区域 –>
<el-form ref=”loginFormRef” :rules=”loginRules” :model=”loginForm” class=”login_form”
label-width=”0″>
<!– 用户名 –>
<!– 用户名 –>
<el-form-item prop=”username”>
<el-input v-model=”loginForm.username” prefix-icon=”el-icon-s-custom”
placeholder=”请输入账号”></el-input>
</el-form-item>
<!– 密码 –>
<el-form-item prop=”password”>
<el-input v-model=”loginForm.password” placeholder=”请输入密码” prefix-icon=”el-icon-loading”
type=”password”></el-input>
</el-form-item>
<!– 按钮 –>
<el-form-item class=”btns”>
<el-button type=”info” plain>提交</el-button>
<el-button type=”warning” plain>重置</el-button>
</el-form-item>
</el-form>
</div>
</div>
</template>
<script>
export default {
data() {
return {
//表单数据对象
loginForm:{
username:””,
password:””
},
//验证对象
loginRules:{
//校验规则
//用户名
username:[
{ required: true, message: ‘请输入账号’, trigger: ‘blur’ },//必填项验证
{ min: 5, max: 20, message: ‘长度在 5 到 20 个字符’, trigger: ‘blur’ }//验证长度
],
//密码
password:[
{ required: true, message: ‘请输入密码’, trigger: ‘blur’ },//必填项验证
{ min: 6, max: 20, message: ‘长度在 6 到 20 个字符’, trigger: ‘blur’ }//验证长度
],
},
};
},
}
</script>
<style lang=”less” scoped>
//根节点样式背景颜色全覆盖
.login_container{
background-color: #2b4b6b;
height: 100%;
}
.login_box{
width: 450px;
height: 300px;
background-color: #c7a3ab;
border-radius: 5px;
position: absolute;//绝对定位
left: 50%;
top: 50%;
transform: translate(-50%,-50%);
.avatar_box {
width: 130px;
height: 130px;
border: 1px solid#eeeeee;
// background-color: #fff;
border-radius: 50%;
padding: 10px;
box-shadow: 0 0 10px #ddd;
position: absolute; //绝对定位
left: 50%;
top: 0%;
transform: translate(-50%, -50%);
background-color: #0ee;
}
img {
width: 100%;
height: 100%;
border-radius: 50%;
background-color: #eee;
}
}
.btns{
display: flex;
justify-content: center;
align-items: center;
/* 将按钮在交叉轴方向上居中 */
.btns.el-button {
margin-left: 80px;
/* 给每个按钮设置左边距,可根据需要调整这个值 */
}
}
.login_form{
position: absolute;
bottom: 0%;
width: 100%;
padding: 0% 10px;
box-sizing: border-box;
}
.custom-submit-button {
background-color: #0088cc;
/* 设置提交按钮的背景色为浅蓝色 */
color: white;
/* 设置文字颜色为白色 */
}
.custom-reset-button {
background-color: #ff9900;
/* 设置重置按钮的背景色为橙黄色 */
color: white;
/* 设置文字颜色为白色 */
}
</style>
挂载axios
import Vue from 'vue'
import App from './App.vue'
import router from './router'
import './plugins/element.js'
//添加全局样式
import '../src/assets/css/global.css'
//引入解决跨域请求额度axios
import axios from 'axios'
//挂载设axios
Vue.prototype.$http=axios
//设置访问路径
axios.defaults.baseURL="http://localhost:9002"


Vue.config.productionTip = false

new Vue({
  router,
  render: h => h(App)
}).$mount('#app')
表单重置:
首先我们看到表单有个ref属性,我们通过这个属性来获取这个表单的对象
<el-form ref="loginFormRef" :rules="loginRules" :model="loginForm" class="login_form" label-width="0">

              省略

                </el-form-item>
我们在重置按钮那里@click来绑定事件,
<el-button type="warning" plain @click="resetLoginForm">重置</el-button>
写一个方法就叫resetLoginFormRef(),我们调用
this.$refs.loginFormRef.resetFields();
其中resetFields()这个方法是用来重置表单的
 login(){

            //箭头函数,如果输入了账号密码就会返回true,否则返回false
        this.$refs.loginFormRef.validate( valid=>{
            console.log(valid)


        }  )
validate 方法主要用于触发表单的验证操作,并根据验证结果执行相应的逻辑
发送登录请求:
this.$refs.loginFormRef.validate(async valid=>{   //当表单中的所有验证规则都满足时,valid 会被设置为 true
          if(!valid) return;
          const {data:res}=await this.$http.post("test");
            console.log(res);
当前所在的函数(也就是包含这行代码的外层函数,比如可能是某个组件方法)是一个异步函数(因为能使用 await 关键字的函数必须是异步函数,通常用 async 关键字来声明)。它会暂停当前函数的执行,直到 this.$http.post("test") 这个异步操作完成。
this.$http.post("test"):- 这里假设
this.$http是一个用于处理 HTTP 请求的对象(在 Vue 项目中,可能是基于axios或者其他 HTTP 客户端库进行了封装后的对象)。post是它提供的用于发送 POST 请求的方法,参数"test"表示请求要发送到的目标 URL 路径(这里简单写为"test",实际应用中应该是完整的、有效的 URL 地址,比如"https://example.com/api/test")。 - 这个方法调用会发起一个 POST 请求到指定的 URL,并返回一个
Promise对象。这个Promise对象会在请求完成(成功或失败)时被解决(resolved)或被拒绝(rejected)。
- 这里假设
console.log(res);
- 这一行很简单,就是将前面通过解构赋值得到的变量
res(也就是 POST 请求所获取到的响应数据)输出到浏览器的控制台中。这样在开发过程中,开发人员就可以方便地查看请求返回的数据内容,以便进行调试、验证数据是否符合预期等操作。
如果登录成功后就提示登录成功的信息否则提示登录失败
Vue 提供了这么几个提示信息的:
1. error
用于展示错误消息,告知用户操作出现了问题或发生了错误情况。例如在登录时用户名或密码错误、网络请求失败等场景下会使用到。以 Element UI 为例:
this.$message.error("用户名或密码错误,请重新输入。");2. warning
用于展示警告消息,提示用户某些情况可能需要注意,但不一定意味着操作已经失败。比如用户输入的内容可能存在潜在风险、某些设置即将超出允许范围等场景。同样以 Element UI 为例:
this.$message.warning("您输入的密码过于简单,请重新设置一个更安全的密码。");3. info
用于展示一般的信息消息,给用户传达一些普通的、需要了解的内容。比如系统更新通知、新功能介绍等情况。以下是使用 Ant Design Vue 的示例:
this.$message.info("系统将于明日凌晨进行维护,请提前做好准备。");4. loading
有些消息提示组件还提供 loading 功能,用于在某些操作(如长时间的网络请求、复杂的计算等)进行期间向用户展示一个加载中的提示,让用户知道系统正在处理相关事务,而不是无响应状态。例如在发送一个大型文件的网络请求时:
this.$message.loading("正在上传文件,请稍候...");我们的代码:
this.$refs.loginFormRef.validate(
async  valid=>{
if(!valid)return;
const{data:res}=await this.$http.post("test");
if(res=="ok"){
this.$message.success("登录成功");
}else{
this.$mssage.erroe("登录失败");
}
}

)